How to Set Up a New Django Application with HTMX and Tailwind

It’s three months into 2025—Tailwind is old news, Rails is on v8.0.2, Remix is, like, a mature framework, Ubuntu is rewriting GNU coreutils in Rust, and programmers are vibing.
Let’s all just relax, and read a nice, chill blog post—we’re gonna go back to nature and explore a boilerplate Django application.
A couple of housekeeping items before we start:
- This is sort of a tutorial, but it’s also a showcase of (what I think are) some really cool technologies that make writing Python more enjoyable
- I have not built a full, production-ready application out of this template, so keep that in mind if you decide to build something with this same stack
- I’ll be trying to list just about every step I take to set this up, in maybe more detail than you can stomach. I will not be upset if you skip through and pick and choose sections.
- These instructions are geared towards MacOS users, but should be easily adapted to Linux (we will not speak of Windows 🙊)
Here’s the source-code we’ll have as a finished product at the end of this blog.
And here is a list of technologies I’ll be using:
- Django — web framework
- Django templates — allow you to embed dynamic (from Django/Python backend) data in HTML files (analogous to
.html.erbfiles) - HTMX — a very lightweight Javascript library which enables “over-the-wire” reloads / Single Page Application (SPA)-like behavior without a jungle of Javascript
- Tailwind CSS — inline, utility classes for CSS
- mypy — Type-checking? In Python? Yes.
- pydantic — “the most widely used data validation library for Python”
- uv — A Python package manager (from Astral) that is quickly vying for a spot as the most widely tool in its category
- ruff — A great, fast linter (also from Astral)
- Task — A task runner / build tool — gives structure to utility scripts and build scripts so that I don’t have a wild collection of bash scripts
- PostgreSQL — open-source, relational DB (instead of Django’s default SQLite)
- GitHub Actions — I’ll be adding some of the aforementioned tools to a CI/CD pipeline
Let’s get started!
Prerequisites
These instructions are geared towards MacOS users, but should be easily adapted to Linux (we will not speak of Windows 🙊).
Another note, this post exceeds Substack’s email limit; so, if you’re reading and it suddenly cuts off, try reading in the browser or the app.
Alright.
First, let’s introduce our new, shiny “everything” tool for Python: uv.
They note on their README that they’re, “[a] single tool to replace pip, pip-tools, pipx, poetry, pyenv, twine, virtualenv, and more”, while also being 10-100x faster than pip.
If you’re a brew user, you can install by, well, you can probably guess:
brew install uvNOTE: You need to be on a fairly up-to-date MacOS version — otherwise you might get stuck installing some of uv’s dependencies, like llvm. Don’t ask me how I know that.You can check that uv installed correctly by running:
uv --version
# uv 0.5.13 (Homebrew 2024-12-27)
For this tutorial, I’m using Python 3.13.2, which is uv’s default (as it’s the latest version as of writing). But if you need/want to use a different version, or want to use a different tool for managing your Python versions, see uv’s docs on the subject.
Creating The Project
Once you have uv installed, if you aren’t there already, go ahead and navigate to the place that you typically build stuff on your machine:
cd ~/projectsAnd make a new directory via uv’s init command:
# We'll be using the name slam_dunk throughout the rest of the examples
# but this can be whatever you want
uv init slam_dunk
And then we can cd into that new project:
cd slam_dunkIf you take a look at the project structure at the moment, it’s going to look like:
.
├── .python-version
├── README.md
├── hello.py
└── pyproject.toml

1 directory, 4 files
It’s pretty barren right now, but don’t worry, we’re about to generate a whole bunch of goodies.
Before we move on to adding dependencies, it’s good practice to initialize this as a git repository.
So, assuming you have the git CLI, run:
git initAnd you’re going to want at least a basic .gitignore file:
# ~/projects/slam_dunk/.gitignore

# uv virtual environment
.venv

# python stuff
__pycache__
*.pyc
Adding Dependencies With uv
It’s really easy to add dependencies and generate a lockfile using uv. Let’s start with Django.
uv add djangoNOTE: You might need to runuv venvto initialize the virtual environment before runninguv add django.
Now, if you’ve only ever used requirements.txt (which I know some of you barbarians do) this next part might be a little confusing; but, I think you’re going to like it. uv uses a pyproject.toml to manage project metadata, which is a lot more similar to something like a Cargo.toml in Rust (cargo is, like, the gold standard in package managers — no asterisks needed).
There you’ll see some project metadata, like name, version, description, but also some semantic versioning info. This pyproject.toml file will be modified whenever you call uv add {dependency}. Also, the uv.lock file which captures exact versions (not just semantics) will be updated. You’re going to want to check both of these files into source control. All of this will make managing dependencies and tracking their changes in source control a lot easier! Yay!
Here’s our pyproject.toml at this current point in time.
[project]
name = "slam-dunk"
version = "0.1.0"
description = "Add your description here"
readme = "README.md"
requires-python = ">=3.11"
dependencies = [
    "django>=5.1.7",
]
Right now we just have a minimum Python version as well as our django dependency we added via uv add django. There is some more advanced stuff you can do here, like adding development-specific dependencies, or dependency groups—you can read more about that here. But we’re not going to explore that in this post.
Now let’s create our Django application:
uv run django-admin startproject coreI’ve named the Django app core, but again, you can name it (almost) whatever you want.
Now you should have something like:
.
├── README.md
├── core
│   ├── core
│   │   ├── __init__.py
│   │   ├── asgi.py
│   │   ├── settings.py
│   │   ├── urls.py
│   │   └── wsgi.py
│   └── manage.py
├── hello.py
├── pyproject.toml
└── uv.lock

3 directories, 10 files
Sweet, now we have a very simple, boilerplate Django app. We can’t really do anything with it, though, since we haven’t added any models.
So, let’s add a user model.
Adding Users
The standard practice in Django is to add user authentication as a separate “app”.
We can do that using the manage.py command we got from initializing our Django project.
cd core  # move into our django app
uv run python manage.py startapp users
This will scaffold a new directory, users/ (and a couple of new files) inside of the core/ directory.
.
├── README.md
├── core
│   ├── core
│   │   ├── __init__.py
│   │   ├── asgi.py
│   │   ├── settings.py
│   │   ├── urls.py
│   │   └── wsgi.py
│   ├── manage.py
│   └── users
│       ├── __init__.py
│       ├── admin.py
│       ├── apps.py
│       ├── migrations
│       │   └── __init__.py
│       ├── models.py
│       ├── tests.py
│       └── views.py
├── hello.py
├── pyproject.toml
└── uv.lock
Then, in order for our core app to use the new app correctly, we need to add it to the list of INSTALLED_APPS in our settings.py file.
# inside of ~/projects/slam_dunk/core/core/settings.py

# ...

INSTALLED_APPS = [
    'django.contrib.admin',
    'django.contrib.auth',
    'django.contrib.contenttypes',
    'django.contrib.sessions',
    'django.contrib.messages',
    'django.contrib.staticfiles',
    'core',  # Add this line!
    'users', # And this line!
]
Alright! Now, we’re getting somewhere. While we’re in the settings.py file, we’re going to make one more change. We’re going to swap PostgreSQL in for SQLite. This is going to require that you have a local Postgres server running. (If you don’t have this setup, I recommend just managing this through brew. See this tutorial for specifics.)
(If you don’t want to do use PostgreSQL, you can skip to the next section — but my examples will assume you’re using PostgreSQL)
First, find the DATABASES definition—
DATABASES = {
    'default': {
        'ENGINE': 'django.db.backends.sqlite3',
        'NAME': BASE_DIR / 'db.sqlite3',
    }
}
—and replace that with—
DATABASES = {
    'default': {
        'ENGINE': 'django.db.backends.postgresql',
        'NAME': 'slam_dunk_development',
        # 'USER': 'postgres',
        # 'PASSWORD': 'Password123!',
        'HOST': 'localhost',
        'PORT': '5432',
    }
}
Feel free to change user and password to whatever you’d like.
Oh, and we never installed the dependency we need for PostgreSQL:
uv add psycopg2Now, we’re going to need to actually create and migrate our database. We *could* do that just by running a psql command to make the DB, and then uv python manage.py migrate but we’re going to do things a little different.
Introducing Tasks
Task is a hot, new-ish task runner / build tool, which is written in Go, and better than Make (or, an even worse alternative, a chaotic series of bash scripts).
You can install Task with—
brew install go-task—or with one of the alternative methods listed here.
To get started with Task, we can write a new file at our project root called Taskfile.yaml. It can look something like this, and you can extrapolate how you could write other tasks based on our reset_db task.
# ~/.projects/slam_dunk/Taskfile.yaml

version: "3"

tasks:
  reset_db:
    desc: "Reset the database (drop, create, and seed)"
    cmds:
      - echo "Dropping the database if it exists..."
      - psql -U postgres -c "DROP DATABASE IF EXISTS slam_dunk_development;"
      - echo "Creating the database..."
      - psql -U postgres -c "CREATE DATABASE slam_dunk_development;"
      - echo "Migrating database..."
      - uv run python core/manage.py migrate
      - echo "Running setup_db management command to seed the database..."
      # - uv run python core/manage.py setup_db
    env:
      DATABASE_URL: postgres://postgres:password@localhost:5432
This task assumes some things about DB users, passwords, and ports, but it’s pretty simple — it resets your DB (dangerously—would definitely want to guard against using this in production!), and recreates it. I commented out a line near the end, but you could uncomment that and add a management command in order to seed your DB at the end of this task.
Play around with this, and run it like:
task reset_dbOnce you get that to work, you should be able to run:
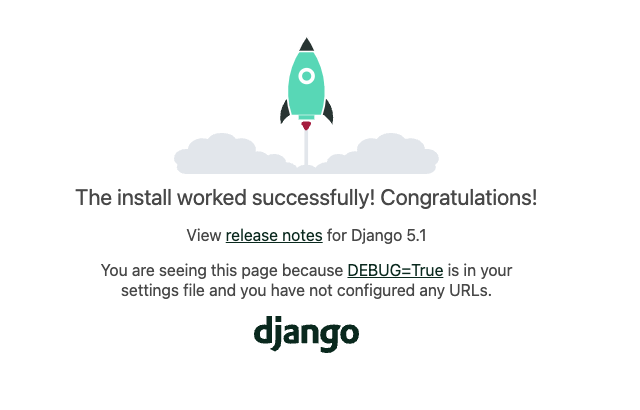
uv run python manage.py runserverand you should be able to view localhost:8000 and see the welcome to Django screen.
You actually could have actually done this a long time ago, but now you won’t get warnings about having migrations to run.
And if you run the interactive user creation script that Django provides…
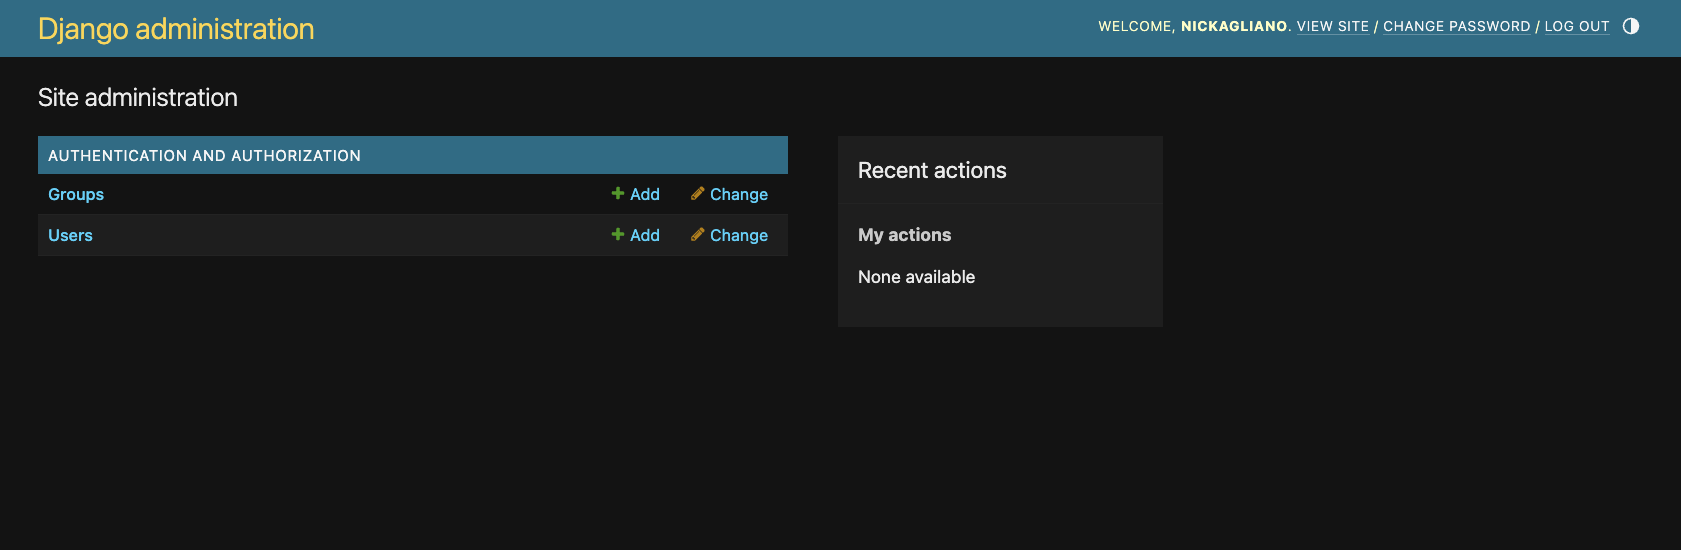
uv run python manage.py createsuperuserYou can then log-in to the Django admin page at localhost:8000/admin. Plop in your credentials, and… you’re in!
Templates and Views (and Introducing HTMX, Tailwind)
Now, let’s build our proof-of-concept front-end. This isn’t going to be (practically) useful for anything, really, other than stubbing out how Django, Django templates, and HTMX plays together.
Before we get underway, let’s go back to our settings.py and make one, last change.
TEMPLATES = [
    {
        'BACKEND': 'django.template.backends.django.DjangoTemplates',
        "DIRS": [BASE_DIR / "templates"],  # Look for templates at the project level
        'APP_DIRS': True,
        'OPTIONS': {
            'context_processors': [
                'django.template.context_processors.debug',
                'django.template.context_processors.request',
                'django.contrib.auth.context_processors.auth',
                'django.contrib.messages.context_processors.messages',
            ],
        },
    },
]
All of these are the default TEMPLATES settings, except for the DIRS value. We change this because want to be able to specify project-level templates.
Then we can go into the top-level of our Django app and create a templates/ folder.
mkdir ~/projects/slam_dunk/core/templatesFirst, let’s make a base.html template → This file is long so I have to link to GitHub.
Sorry, I know that’s a lot a lot of code all at once.
I want to highlight that we’re including two CDNs in the <head/> here.
- HTMX
- Tailwind CSS
<script src="https://unpkg.com/htmx.org@2.0.4"></script>
<script src="https://cdn.tailwindcss.com"></script>
NOTE: This is not how you should do this in production—it just makes our example easier.
A couple other things—
The base template has Tailwind utility classes sprinkled throughout to make it look decent. If you’re unfamiliar, you’ll have to read through their docs.
We can also see our Django templating at work. We’re interpolating good bit of dynamic data into our HTML, checking if the user is authenticated, displaying their username, etc.
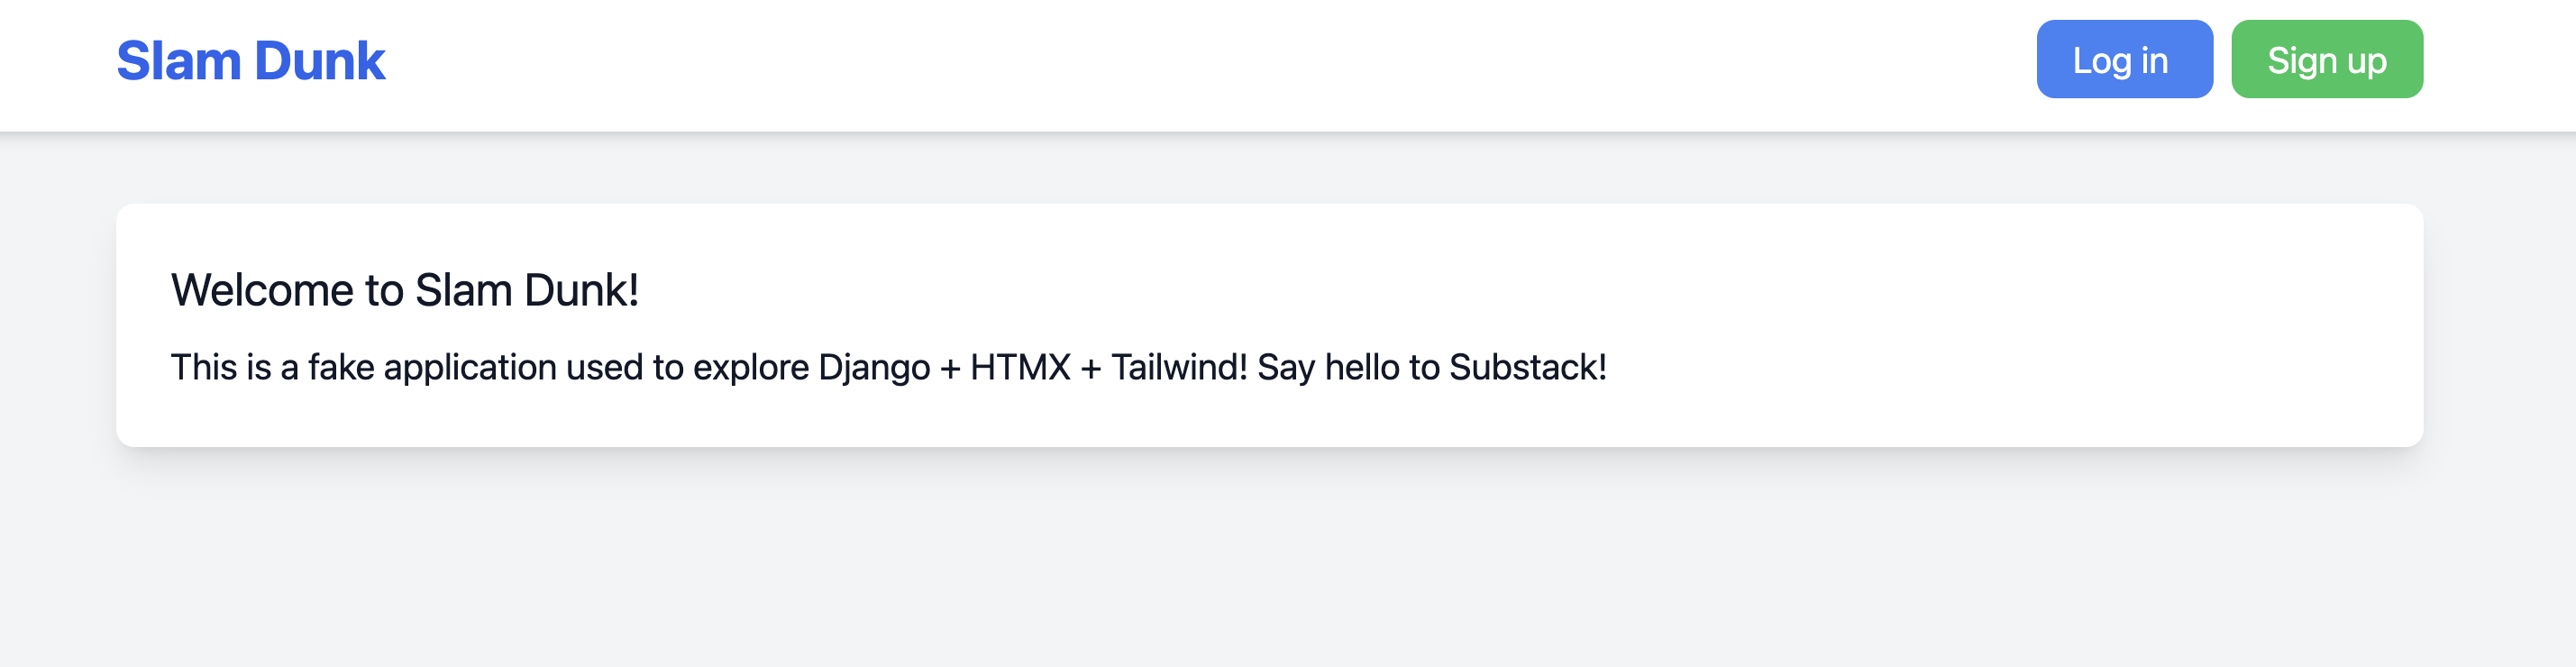
Now, within the same templates/ dir, let’s create home.html.
{% extends "base.html" %}

{% block content %}
    <h1 class="text-xl mb-2">Welcome to Slam Dunk!</h1>
    <p>This is a fake application used to explore Django + HTMX + Tailwind! Say hello to Substack!</p>
{% endblock %}
Here, we’re extending the base.html template (which also gives us HTMX and Tailwind CSS).
Now, if we look at localhost:8000, we see… still the Django welcome page. Darn. This is because we haven’t created a view that uses these templates.
# ~/project/slam_dunk/core/core/views.py

from django.shortcuts import render

def home(request):
    return render(request, "home.html")
We need to add this file to our core application, then connect this to our urlpatterns:
# ~/project/slam_dunk/core/core/url_patterns.py

from django.contrib import admin
from django.urls import path, include
from .views import home

urlpatterns = [
    path('admin/', admin.site.urls),
    path("", home, name="home"),  # This line is new
]Now, if we look at localhost:8000…
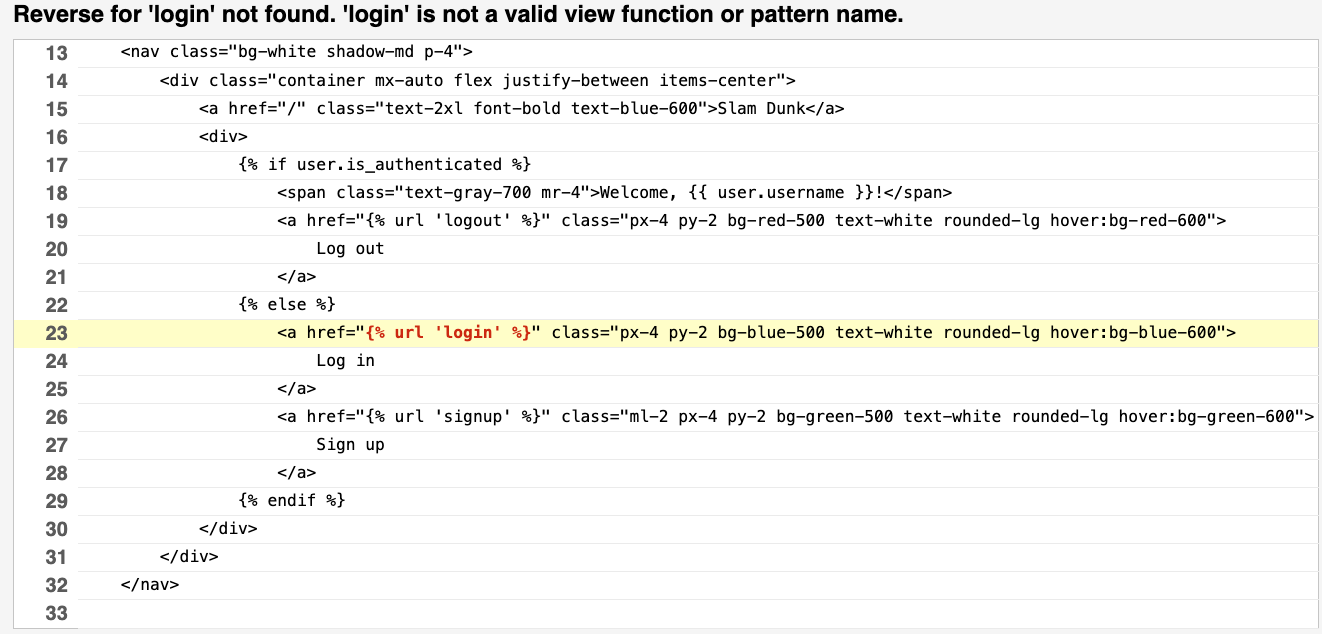
Rats.
We still need to define the login, signup, and logout routes!
Looks like we got a little bit ahead of ourselves with that base.html template.
Before we move on to the next section, while we’re still in the urls.py file, go ahead and add this other line as well—we’re going to need it in just a second—
from django.contrib import admin
from django.urls import path

from django.contrib import admin
from django.urls import path, include
from .views import home

urlpatterns = [
    path('admin/', admin.site.urls),
    path("users/", include("users.urls")), # This line is new
    path("", home, name="home"),
]
HTMX and Making Our Django Views Awesome
We need to implement a couple of things before we can really use this new front-end of ours.
This section covers a lot of topics, so buckle up.
But before we go too far into this section, we’re going to need to import some new libraries.
uv add mypy ruff pydantic django-stubsWe’re going to use these to make our Python more zen-like. It’s going to be more work up-front, but will save our butts later on.
I was inspired, in part, to build this boilerplate example because I read a blogpost by Jakub Beránek, “Writing Python like it’s Rust”. Check it out if you haven’t already.
First, we’re going to go into the users/ dir and update two different files:
views.pyurls.py
Starting with views.py, we are going to need 3 different actions—
signup_viewlogin_viewlogout_view
These methods are too long for me to include in this post, so check them out on GitHub.
These views need to work alongside three new templates. These will live in a new templates/ dir, inside of the users/ app.
Once we fill in the views, urls, and templates, we can actually open our app and see all of this working together.
I want to explore and explain the code I’ve linked to in GitHub, but I don’t have the mental or Substack real-estate to go into every single detail—so let’s explore HTMX, at a high level, through the signup and login forms.
The signup form has this definition:
    <form
      hx-post="{% url 'signup' %}"
      hx-target="#signup-response"
      hx-swap="innerHTML"
    >
These are some really powerful lines of code, and serve as a window into why Django and HTMX work really well together.
Here, we’re saying (in HTMX-ese) that we want to POST the form to the user signup URL, and when we get a response from Django, replace the innerHTML of the target (a div which we’ve defined after the form) with that response.
This swapping works great if our response is an error. For example, on our login page:
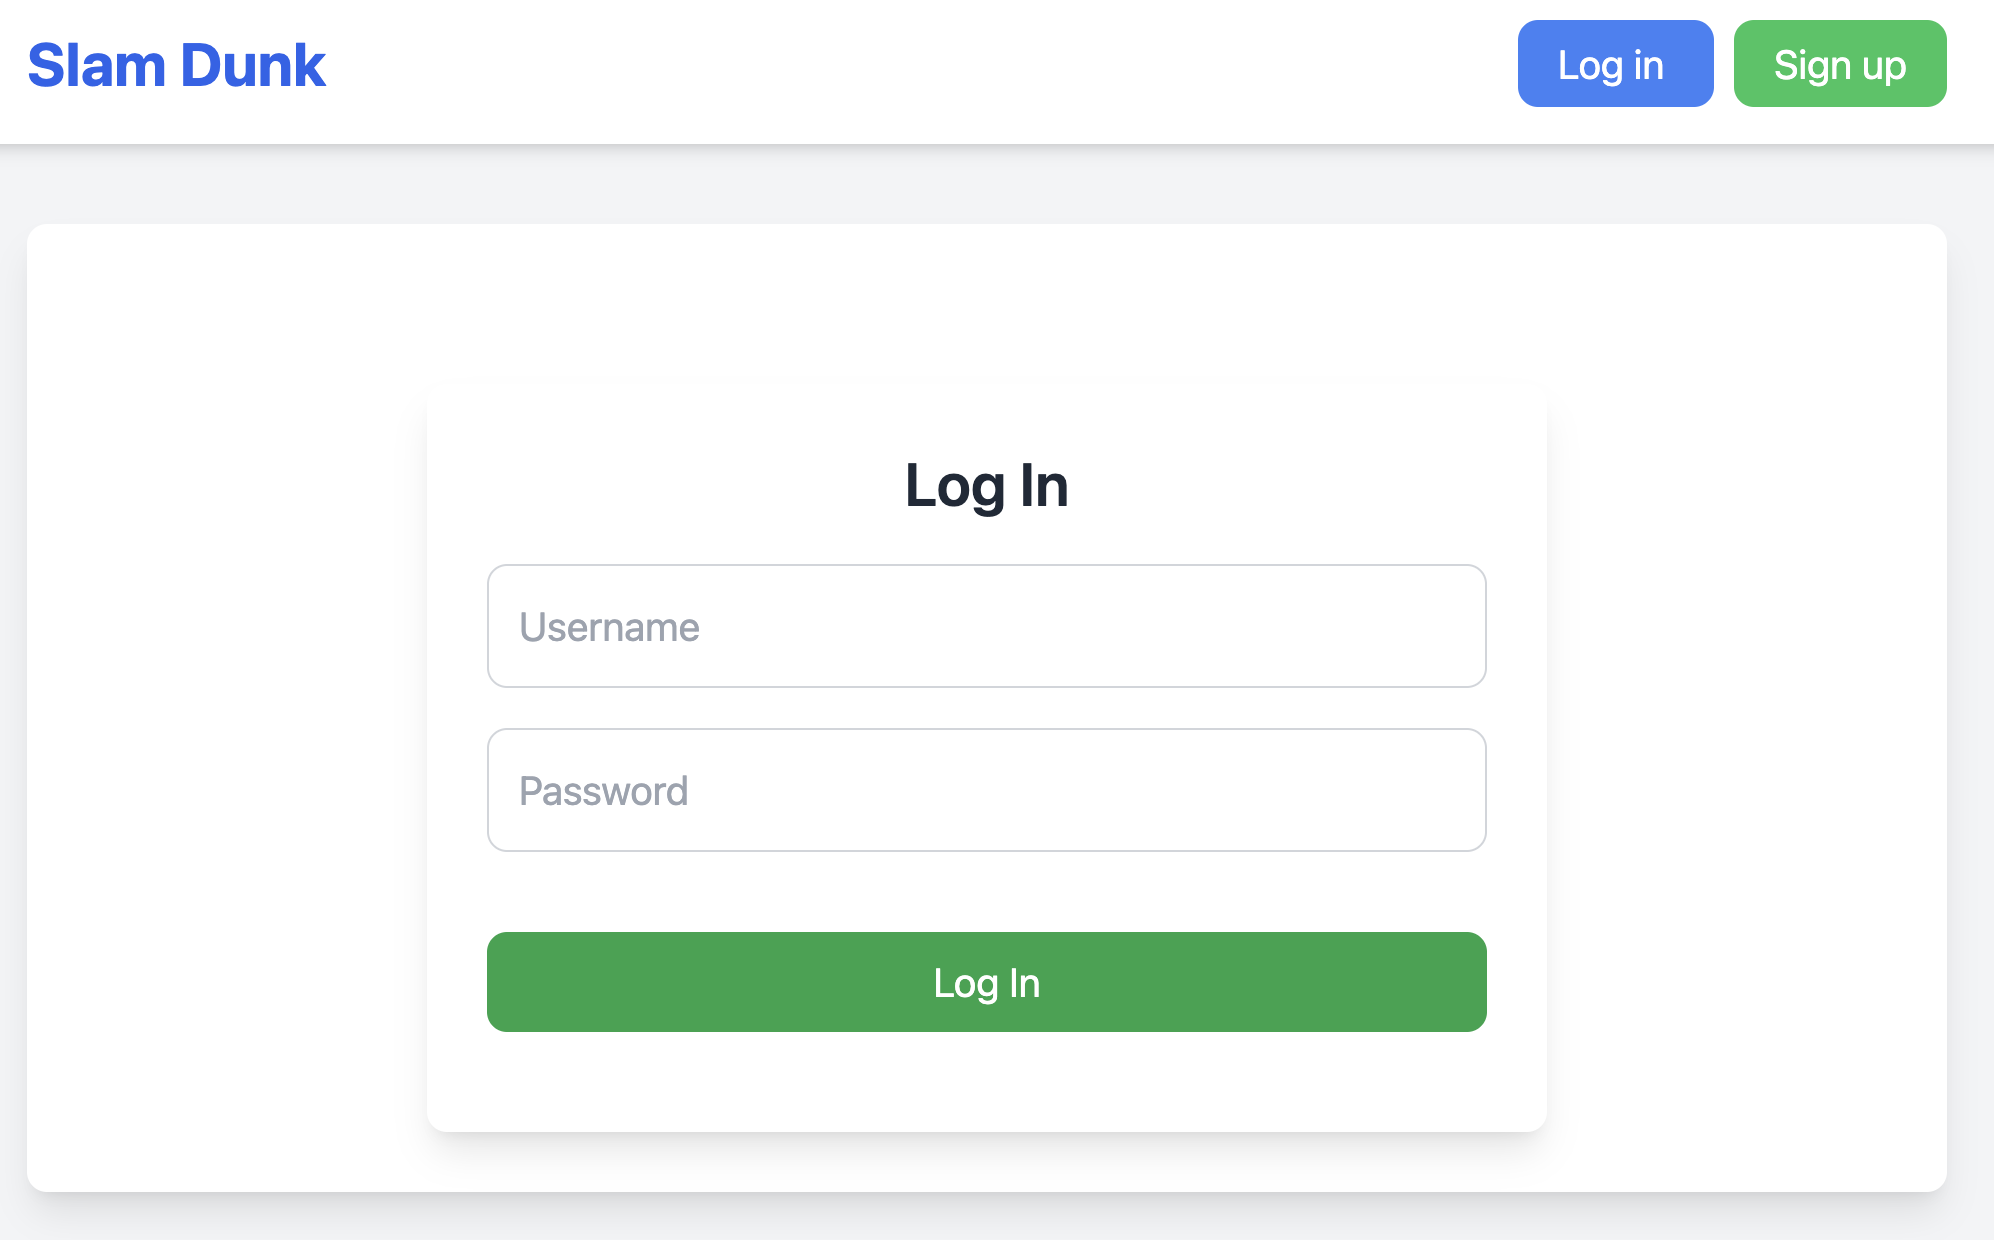
If we input the wrong username and password—
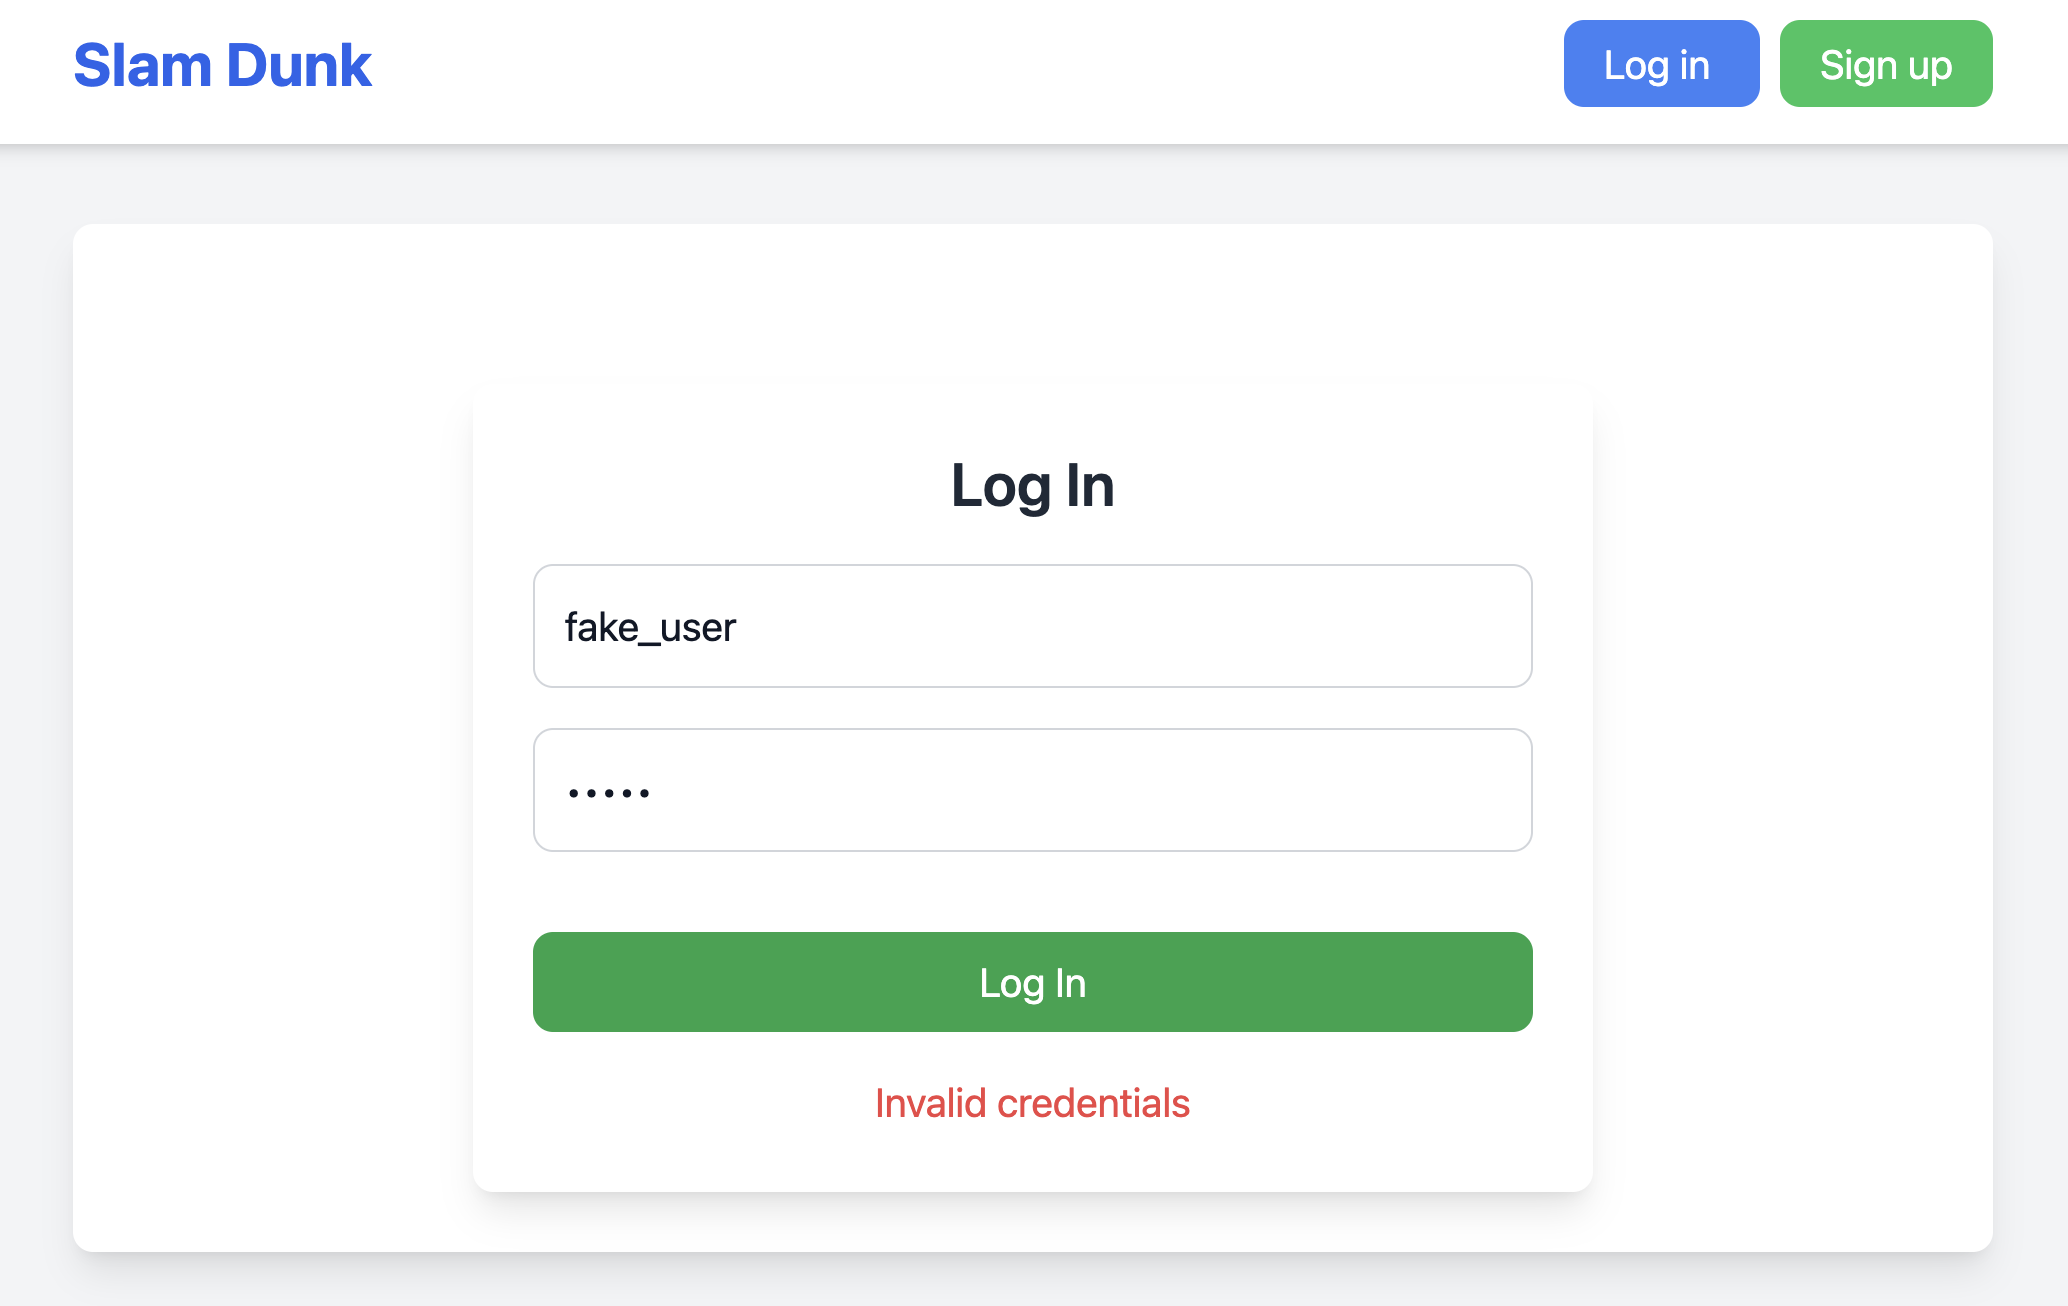
This red “Invalid credentials” error message is coming from our users/templates/errors.html template.
This is the error template. It’s is very small — just 3 lines of code:
<div id="error-message" class="text-red-500 mt-4">
    {{ error }}
</div>
We render this template by calling render in our login_view in users/views.py.
But I do want to highlight that I hit a snag while I was introducing HTMX to the app.
It was here, in the users/views.py, where we implement a very, very simple redirect. When a user signs up or logs in, I want to redirect them to the home page. In order to do so, you have to set the HX-Redirect header. It’s not very that this is how you do it, so, you’re welcome I guess. Hopefully that saves someone some headache.
We use this redirect when the form is successful. So, there are basically two scenarios we’ve accounted for with HTMX:
- When error state → Render error in our target div
- When success → Redirect user to new page
Type Hints and pydantic
We can further improve our user signup flow by using pydantic and type hints.
We’re already using a small number of type-hints (see the method definitions in users/views.py).
And you might’ve seen that we’re already importing—
from pydantic import ValidationError —in our user/views.py, and catching the ValidationError. But we haven’t actually used pydantic to validate anything.
Think of this as your homework.
Try importing the UserCreate model from users/models.py (here) and using that in the signup action.
Hint:
You’ll be able to do something like…
user_data = UserCreate(username=username, email=email, password=password)GitHub Actions
I’m already over the Substack email length limit, but I don’t want to leave you without showing how to hook up all of our hard work to GitHub Actions. Here I’m just hooking up all of our stuff to a CI/CD pipeline, so we are more pressured to actually write typehints, run the linter, etc.
Conclusion
Again, all of the source code is here. I have more to say, but this is long enough for now. Maybe I’ll write a follow-up once I get this tech stack into production!
Cheers!